As we know from a Google report on micro-moments, 70 percent of people abandon an app when it takes too long to load. That’s why your app has to be smooth and slick. UIKit performance optimization is one of the major ways to ensure that.
In this post, we’ll talk about how to boost UIKit performance for iOS apps (and for iOS developers too). We’ll consider the most crucial things and best practices that a fast and cool UI depends on. Ready? Let’s go!
What are the main issues with UIKit?
The first issue we’ll talk about is color blending. Blending is the stage of frame rendering during which the final pixel color is computed. Each UIView (to be more precise, each CALayer) affects the color of the final pixels if you combine a set of properties like alpha, backgroundColor, opaque, and all the overlapping views.
Let’s start with the most used UIView properties: UIView.alpha, UIView.opaque, and UIView.backgroundColor.
Opaque vs transparent
UIView.opaque tells the renderer to treat the view as a fully opaque tile, improving drawing performance. The opaque option allows the renderer to skip drawing the underlying views as well as color blending when producing the final color. Correct simply uses the topmost color of the view.
Alpha
If the value of an alpha property is less than 1, the opaque flag will be ignored (even if its value is YES).
    let purpleRect = UIView(frame: purpleRectFrame)
    purpleRect.backgroundColor = .purple
    purpleRect.alpha = 0.5

    view.addSubview(purpleRect)
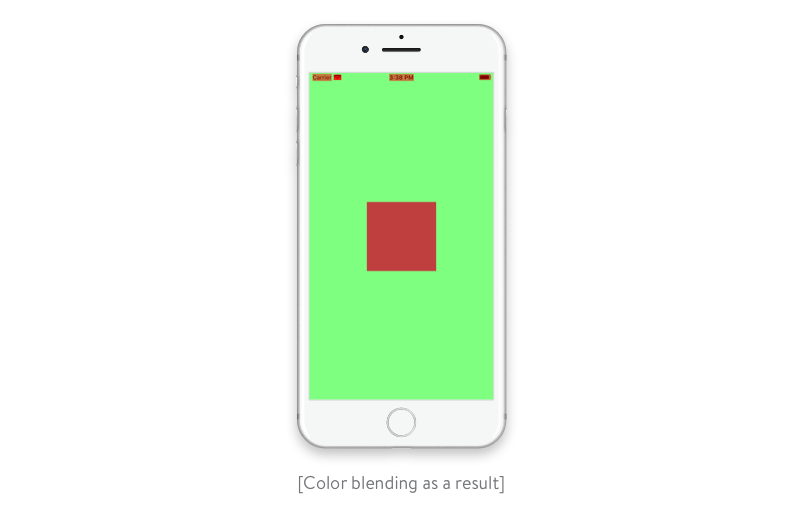
Though the default value of opaque is YES, we have color blending because we made our view transparent by setting the value of the alpha property to less than 1.
How to find blended layers?
Disclaimer: If you want precise information about real performance, you should test your UIKit application on a real iOS device, not a simulator. The iOS CPU is slower than your Mac CPU, and the GPU in your iOS device is very different from the one in your Mac. For our tests, we were using:
- iPhone 7 with iOS 13.2 (17B84)
- Xcode 11.3.1 (11C504)
- MacBook Pro with macOS 10.15.2 (19C57)
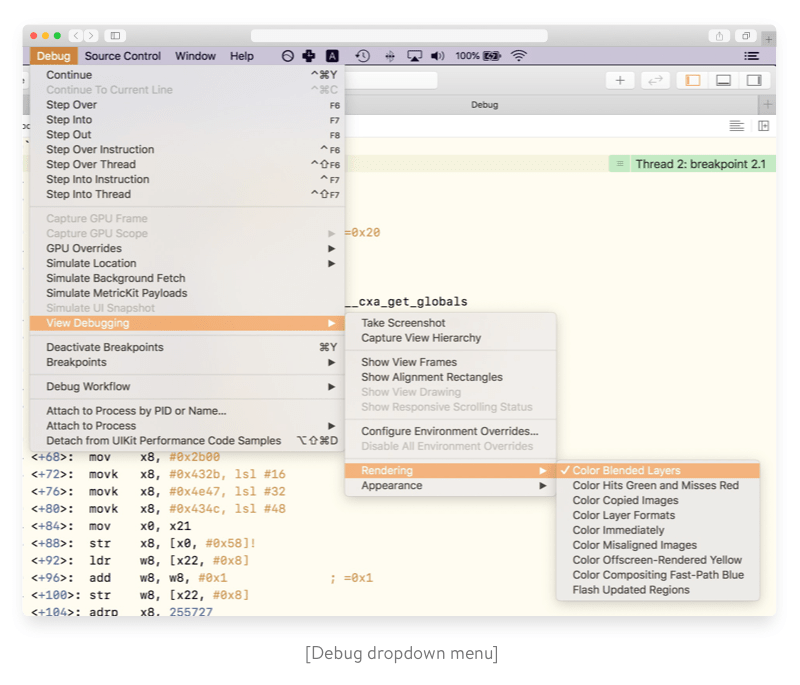
Let’s go to the Debug menu in the Xcode iOS simulator and find an item called Color Blended Layers. It tells the debugger to show blended view layers where multiple semi-transparent layers overlap. Layers highlighted red are multiple view layers that are drawn on top of each other with blending enabled. Layers highlighted green are multiple view layers drawn without blending.
To color blended layers on an iOS device, in Xcode go to Debug –> View Debugging –> Rendering –> Color Blended Layers.
Below, we’ll explain the cases when we use blended layers while testing.
Alpha channel in images
Color blending happens when the alpha channel affects UIImageView transparency (and the alpha property of UIImageView). Let’s use a category for UIImage to receive our image with a custom alpha channel:
extension UIImage {
func image(withAlpha value: CGFloat) -> UIImage? {
UIGraphicsBeginImageContextWithOptions(size, false, 0)
let ctx = UIGraphicsGetCurrentContext()
let area = CGRect.init(origin: .zero, size: size)
ctx?.scaleBy(x: 1, y: -1)
ctx?.translateBy(x: 0, y: -area.height)
ctx?.setBlendMode(.multiply)
ctx?.setAlpha(value)
ctx?.draw(cgImage!, in: area)
let newImage = UIGraphicsGetImageFromCurrentImageContext()
UIGraphicsEndImageContext()
return newImage
}
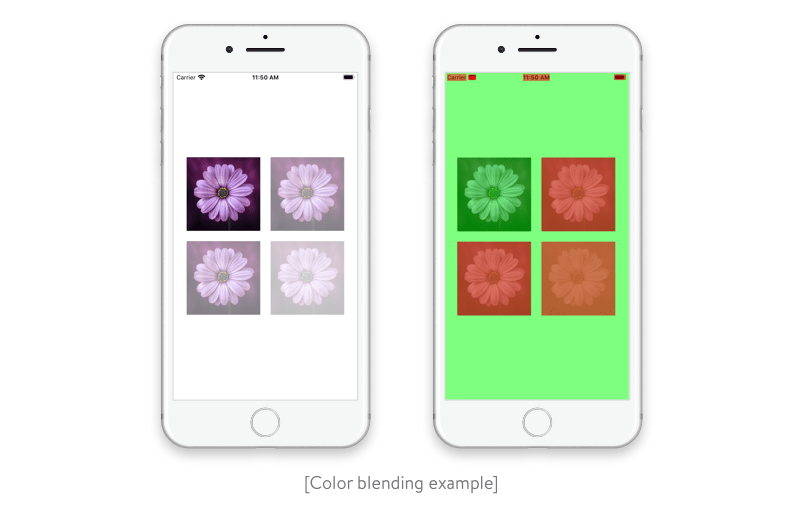
}We’re going to consider four cases of possible transparency combinations with alpha channels:
- UIImageView has a default value of the alpha property (1.0), and the image doesn’t have an alpha channel.
- UIImageView has a default value of the alpha property (1.0), and the image has an alpha channel modified to 0.5.
- UIImageView has a modified value of the alpha property, and the image doesn’t have an alpha channel.
- UIImageView has a modified value of the alpha property, and the image has an alpha channel modified to 0.5.
  override func viewDidLoad() {
    super.viewDidLoad()
    createImageViews()

    let flowerImage = UIImage(named: "flower")
    let flowerImageWithAlpha = UIImage(named: "flower")?.image(withAlpha: 0.5)

    imageView1.image = flowerImage

    imageView2.image = flowerImageWithAlpha

    imageView3.image = flowerImage
    imageView3.alpha = 0.5

    imageView4.image = flowerImageWithAlpha
    imageView4.alpha = 0.5
  }
Read also: Lightweight iOS View Controllers through separate datasources
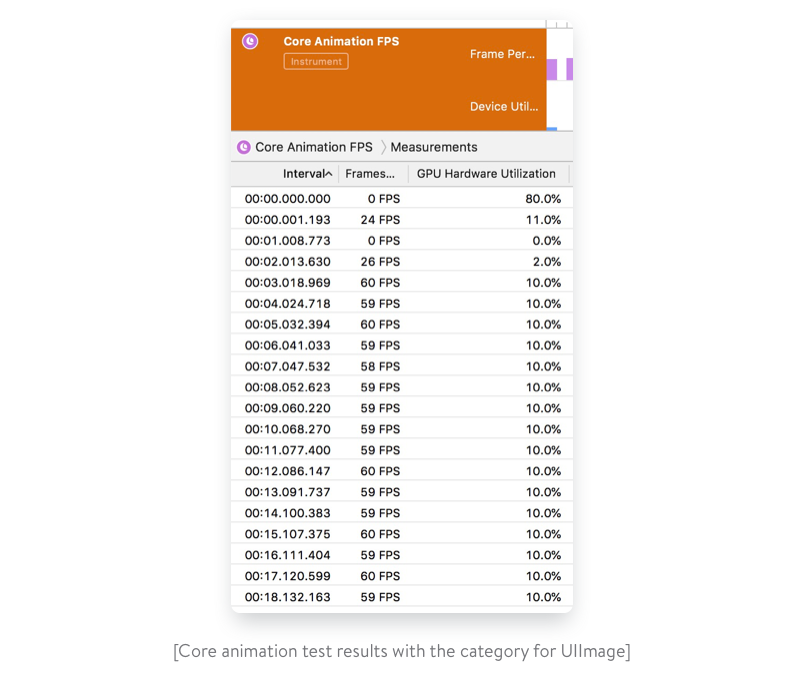
The iOS simulator shows us the blended view layers. So even if our instance of UIImageView has an alpha property with a default value of 1.0 and the image has a modified alpha channel, we get a blended layer. That’s probably why the official Apple documentation encourages us to reduce the amount of red in the app when this option is selected to dramatically maximize performance. The documentation also states that blended view layers are often the cause of slow table scrolling.
To render transparent layers, you need to perform additional computations. The system has to blend the layer with the layer below to compute its color and draw the image.
Off-screen rendering
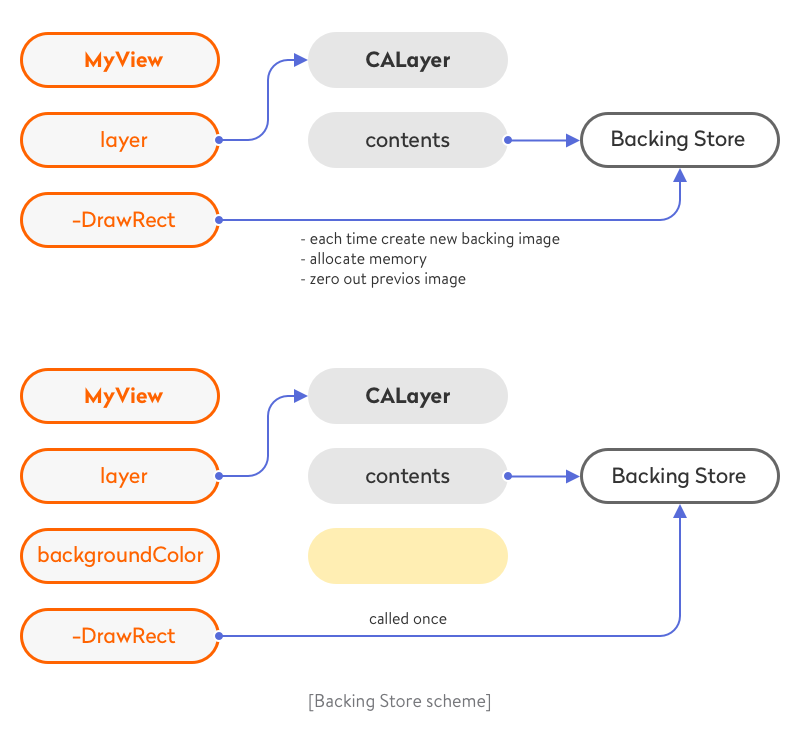
Off-screen rendering is drawing that cannot be done with the GPU and should instead be performed on the CPU. At a low level, it looks like this: when rendering a layer that requires off-screen rendering, the GPU stops the rendering pipeline and passes control to the CPU. Next, the CPU performs all the necessary operations and returns control to the GPU along with the rendered layer. The GPU renders the layer, and the rendering pipeline keeps going. In addition, off-screen rendering requires the allocation of additional memory for a so-called backing store. This isn’t needed for hardware-accelerated layers, however.

Here are cases when you get off-screen rendering:
Custom drawRect (even if you simply fill the background with color)
CALayer corner radius
CALayer shadow
CALayer mask
Any custom drawing using CGContext
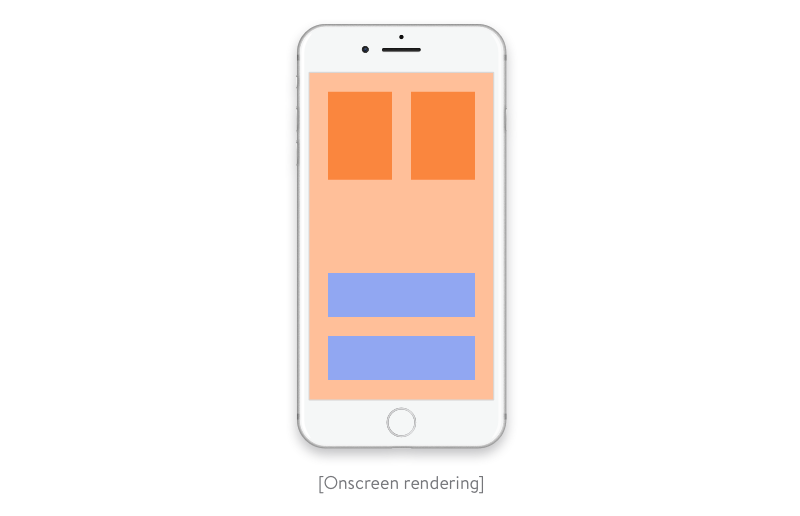
We can easily detect off-screen rendering using Xcode or the Debug menu in the iOS simulator. Each place where off-screen rendering occurs will be covered with a yellow overlay.

Before we head to the testing itself, there’s an important thing you should always keep in mind: don’t abuse overriding -drawRect. Doing so may easily lead to off-screen rendering, even in a simple case when you need to fill the background with color.
If you want to make your own implementation of -drawRect only for, say, setting a background color, consider taking advantage of the proper UIViewbackgroundColor property that’s available out of the box.
The -drawRect approach is unreasonable for two reasons. Firstly, system views may implement private drawing methods to render their content, and it’s obvious that Apple puts effort into optimizing drawing. Also, we should remember the backing store — a new backing image for the view, with pixel dimensions equal to the view size multiplied by the contentsScale, which will be cached until the view needs to update it.
Secondly, if we avoid overriding -drawRect, we don’t need to allocate additional memory (we get to minimize memory footprint) for the backing store and zero it out each time we perform a new drawing cycle.
How can you test UIKit performance?
We’ll start with a couple of off-screen rendering cases and test the performance. We’ll try to find a proper solution to improve the performance and implement your vision with a great design.
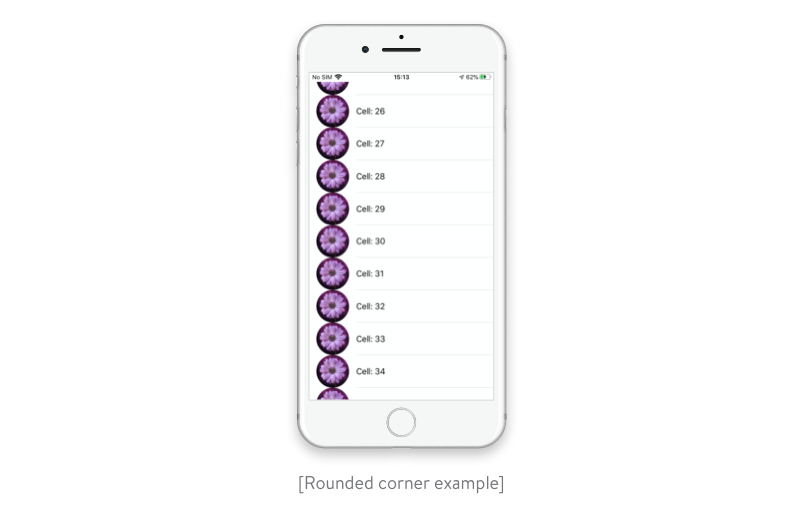
Rounded corners
Let’s create a simple tableView with our custom cell and put UIImageView and UILabel to our cell prototype. Remember the good old times when the buttons were round? To achieve this fancy effect in tableView we need to set CALayer.cornerRadius and CALayer.maskToBounds to YES.
  func tableView(_ tableView: UITableView, cellForRowAt indexPath: IndexPath) -> UITableViewCell {
    let cell = tableView.dequeueReusableCell(withIdentifier: String(describing: UITableViewCell.self), for: indexPath)

    cell.textLabel?.text = "Cell: \(indexPath.row)"

    cell.imageView?.layer.cornerRadius = 22
    cell.imageView?.layer.masksToBounds = true
    cell.imageView?.image = UIImage(named: "flower")

    return cell
  }
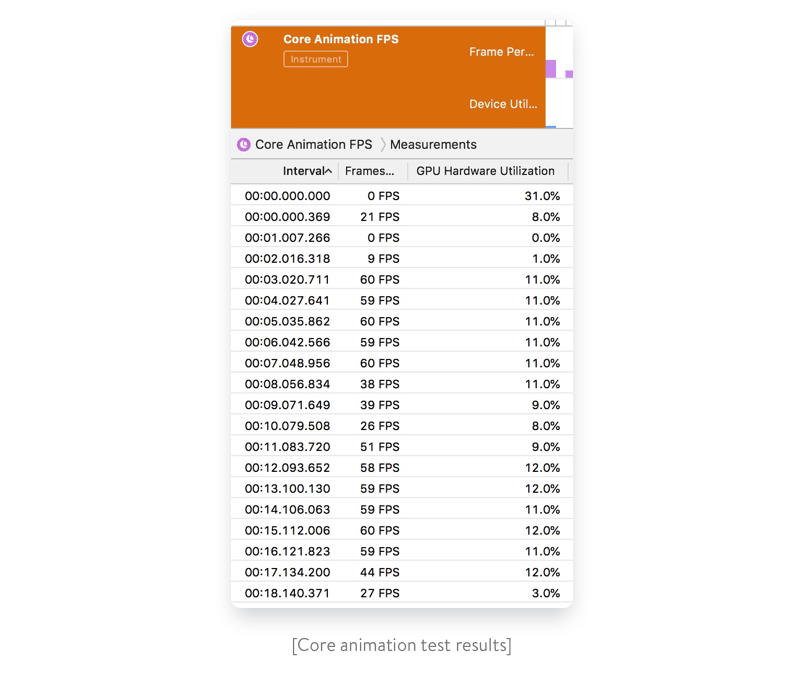
Although we’ve achieved the desired effect without Instruments, the performance is far from the recommended 60 frames per second (FPS). That’s why we’ll test the performance with Instruments.
First of all, let’s enable the Color Offscreen-Rendered Yellow option. This way, all instances of UIImageView will be covered with a yellow overlay.

Now we should check the performance with the Core Animation tool in Instruments.
It’s clear that we need another approach to achieve the desired effect and increase performance. Let’s use a category of UIImage to make the corners rounded instead of using the cornerRadius property.
extension UIImage {
  func yal_imageWithRoundedCorners(and size: CGSize) -> UIImage? {
    let rect = CGRect(origin: .zero, size: size)

    UIGraphicsBeginImageContextWithOptions(size, false, UIScreen.main.scale)

    let ctx = UIGraphicsGetCurrentContext()
    ctx?.addPath(UIBezierPath(roundedRect: rect, cornerRadius: size.width).cgPath)
    ctx?.clip()

    draw(in: rect)

    let output = UIGraphicsGetImageFromCurrentImageContext()
    UIGraphicsEndImageContext()

    return output
  }
}
Also, let’s modify the implementation of the dataSource method cellForRowAtIndexPath.
  func tableView(_ tableView: UITableView, cellForRowAt indexPath: IndexPath) -> UITableViewCell {
    let cell = tableView.dequeueReusableCell(withIdentifier: String(describing: UITableViewCell.self), for: indexPath)

    cell.textLabel?.text = "Cell: \(indexPath.row)"

    let image = UIImage(named: "flower")
    let imageSize = CGSize(width: 66.0, height: 66.0)
    cell.imageView?.image = image?.yal_imageWithRoundedCorners(and: imageSize)

    return cell
  }
The drawing code is called only once, when the object is first placed on the screen. It’s cached in the view’s CALayer and can be animated without additional drawing. Though this approach is slower than Core Animation methods, it allows us to convert the per-frame cost into a one-time cost.
Before we get back to measuring performance, let’s check the off-screen rendering one more time.
Yay! We got twice the FPS now: 59 to 60!
CALayer.shouldRasterize
Another way to speed up the performance for off-screen rendering is to use the CALayer.shouldRasterize property. It tells the drawing system to render the layer once and cache its contents until the layer needs to be redrawn.
But if iOS has to redraw a layer too often, caching becomes useless because the system will rasterize the layer after each draw. In the end, the usage of CALayer.shouldRasterize depends on the particular use case and profiling results in Instruments.
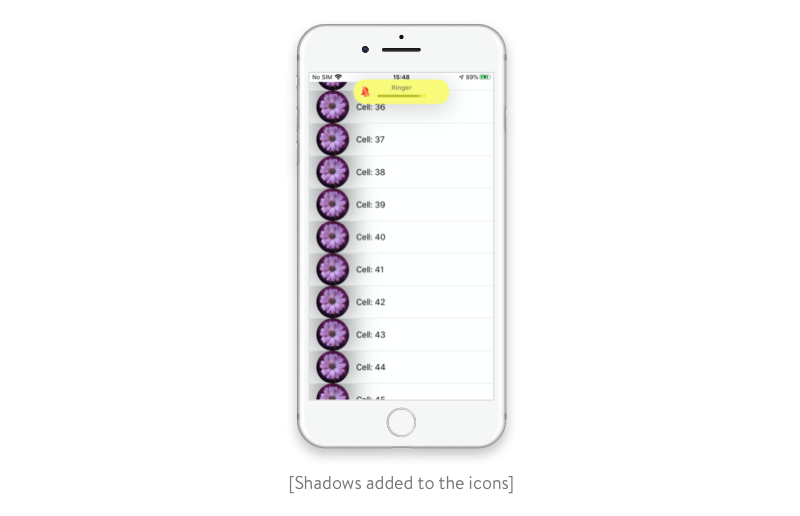
Shadows and shadowPath
Shadows can make the UI more beautiful. On iOS, it’s easy to add a shadow effect:
    cell.imageView?.layer.shadowOpacity = 0.5
    cell.imageView?.layer.shadowRadius = 30
With off-screen rendering turned on, shadows add off-screen rendering and cause Core Animation to compute the shadow path in real time by default. And this leads to a lower FPS.
Apple actually warns us about the costs of adding shadows:
Letting Core Animation determine the shape of a shadow can be expensive and impact your app’s performance. Rather than letting Core Animation determine the shape of the shadow, specify the shadow shape explicitly using the shadowPath property of CALayer. When you specify a path object for this property, Core Animation uses that shape to draw and cache the shadow effect. For layers, whose shape never changes or rarely changes, this greatly improves the performance by reducing the amount of rendering done by Core Animation.
So basically we need to provide a cached shadow path (CGPath) to CoreAnimation, which is quite easy to do:
if let rect = cell.imageView?.bounds {
  cell.imageView?.layer.shadowPath = UIBezierPath(rect: rect).cgPath
}
Now it comes to understanding that we only used one line of code to remove off-screen rendering and enhance the performance by miles. To be honest, there are a lot of UI-related performance issues that can be solved quite easily with a library, some frameworks, and a couple of tricks. So UIKit framework developers (and other developers too), stay tuned for more simple solutions and recommendations for enhancing app performance. And don’t forget to measure performance both before and after optimization!
Ten articles before and after
How to Validate In-App Purchases On-Device and Through a Client’s Own Server
Smart Home Automation for Android on the Example of ZigBee and Z-Wave
Why You Should Not Use Telegram Open Source Code
Best SEO Practices for React Websites
Eight Tips on How to Ensure Core Data Migration
How to Quickly Import Data from JSON to Core Data
Android Studio Plugin Development
Measuring Code Quality: How to Do Android Code Review