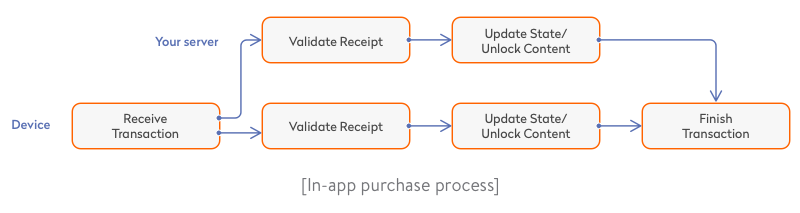
As we know, Apple lets users purchase goods and services in apps using their Apple IDs. But all in-app purchases need to be validated. Using your own server to communicate with the App Store is generally the best option for validating purchases in your application. Why? Because your app will recognize and trust your own server, allowing you to control all transactions between your server and user devices.
However, is server-to-server purchase validation really the only way to go? No. You can alternatively use on-device validation to unlock in-app features and content with no need to connect to your server.
In this article, we’ll describe both options for validating purchases and help you choose the most appropriate one depending on your needs and your app infrastructure. You don’t need any paid resources to implement each of both solutions.
On-device purchase validation
On-device purchase validation is suitable if all purchases are processed locally on one iOS device. But purchases validated on a device won’t be available on your site or in your Android app, for instance. So choose this type of validation if you need a purchase to be available in one iOS platform app only.
We need to use the StoreKit framework which is a part of iOS SDK to get all information on transactions (including status, id, and any errors that may occur). This information is received from the updatedTransactions callback. To ensure this data stream, you need to register a transaction observer as soon as possible after you launch your app. Timely registration will help you avoid missing any transaction states.
// MARK: - SKPaymentTransactionObserver

func paymentQueue(_ queue: SKPaymentQueue, updatedTransactions transactions: [SKPaymentTransaction]) {
    for transaction in transactions {
        switch transaction.transactionState {
        case .purchased:
            // Validate the purchase
        }
    }
}
Using the updatedTransactions callback, you need to successfully perform Swift receipt validation and provide the transaction request (finishTransaction) to mark the transaction as completed.
In order to validate a purchase, you need to get an App Store receipt. This is the app’s trusted record and in-app purchases that are stored on-device as a single file. The receipt contains an Apple digital signature, an app certificate, and information on purchases. The image below shows the iOS receipt validation.
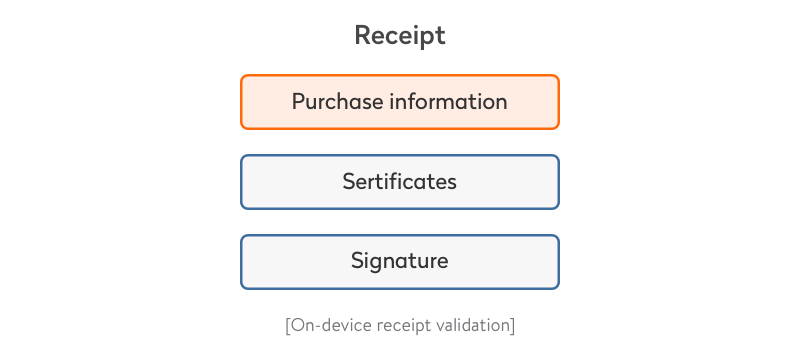
Receipt validation guide
You can locate a receipt using the bundle API:
guard let appStoreReceiptURL = Bundle.main.appStoreReceiptURL,
    FileManager.default.fileExists(atPath: appStoreReceiptURL.path) else {
        return
}
let rawReceiptData = try Data(contentsOf: appStoreReceiptURL)
let receiptData = rawReceiptData.base64EncodedString(options: ...)
If you can’t find the receipt, you should request it. This requires you to have an internet connection and be logged in to the App Store.
let request = SKReceiptRefreshRequest()
request.delegate = self
request.start()
Now you can validate the receipt using OpenSSL, ASN.1 Compiler, or your own analogous solution. To do so, perform the following steps:
Step 1. Check if the receipt is properly signed by the Apple certificate. Don’t check the expiry date of the certificate based on the current date on the device, as the date on the device can be changed. We suggest checking the expiry date against the date of transaction processing.
Step 2. Compare the bundle identifier and bundle version with the values stated in the receipt. But note that these values must be hard-coded (embedded directly into the source code) and not taken from info.plist to avoid the receipt validation code being read by an intruder.
Step 3. Compute the hash of the GUID. This means you need to take the identifierForVendor property from UIDevice and bring together a bundle identifier with an opaque value in the receipt to compare with the value in the receipt. Then you can mark the transaction as finished.
Read also: Core Elements of Data Security
Restoring purchases
There are auto-renewable, non-renewable, consumable, and non-consumable types of purchases. What do they offer to mobile users?
Auto-renewable subscriptions. Users can buy access to services or regularly updated content, such as monthly access to cloud storage or a weekly subscription to a magazine. Users pay for such a subscription on a recurring basis until they choose to cancel it.
Non-renewable subscriptions. Users can buy access to services or content (such as streaming content) for a specific period of time. Such a subscription can’t be renewed automatically.
Non-consumable. Users can buy non-consumable in-app functionality like extra filters in a photo editing app. This functionality is bought once and doesn’t expire.
Consumable. Users can buy different types of products such as lives or gems in a game. Users purchase them to further their progress through an app and can use them only once. These consumables can be bought multiple times.
A user who has bought non-consumable content or an auto-renewable subscription should be able to access those purchases on other devices with the same Apple ID.
To ensure this access, you need a button that requests restoreCompletedTransactions and restores non-consumable content and auto-renewable subscriptions. In the case of a non-renewable subscription, a user has to view the receipt.
If you deal with subscriptions, keep in mind the following:
- A valid receipt doesn’t mean the purchase is accessible or the subscription is active.
- If there’s no valid transaction, refresh the receipt.
- Inspect the purchase date, expiry date, and system date to determine if the subscription is valid. But remember that a user can wind back the clock on their device to extend their subscription.
Server-to-server purchase validation
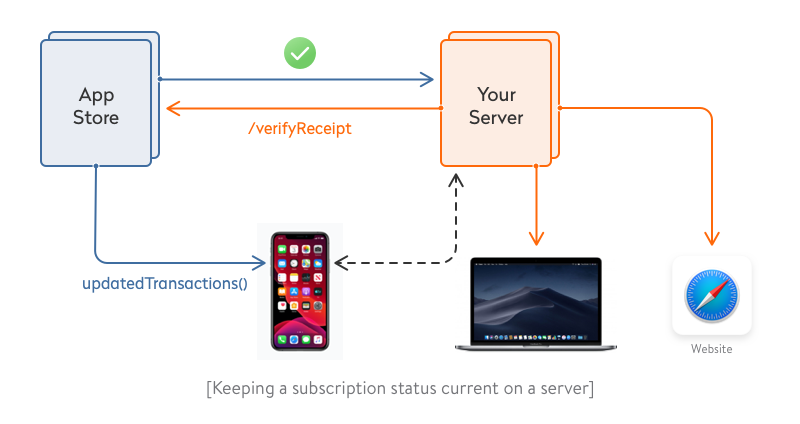
If you choose iOS in-app purchase server validation, only your server (to which you have a secure connection) is responsible for all communication with Apple’s HTTP validation service and for the business logic of comparing and checking dates.
All you have to do in this case is pass a receipt to your server in order to validate a purchase. Then your server passes the receipt and password to the app. A password is only required for a receipt that contains an auto-renewable subscription.
In this case, you can take the password in App Store Connect, which is in In-App Purchases. Your server has to pass the receipt to Apple’s server — specifically, to the /verifyReceipt address.
Then the App Store will return a payload, in JSON format, that contains the receipt status, the receipt itself, and all information on recent purchases. Warning! Never send a receipt directly to your app from the App Store for security reasons.
Advantages of server-to-server over on-device validation:
- You get additional information on subscriptions
- App users always have current information on purchases across all devices
- No susceptibility to date changes on the device
- No need for cryptography
Read also: In-App Purchases on iOS and Android
Keeping the subscription status current on a server
Your server can keep the last version of a receipt and periodically check the status of a subscription — for example, a day before and a day after expiration. By doing so, you can display current information on subscriptions on all of a user’s devices without the user needing to open an app.
Why knowing the subscription is active isn’t enough — and how to deal with it
Let’s suppose you have the following questions:
- Why has the user ended their subscription?
- Will they renew it?
- Why did AppleCare return money to the user?
- Will the user agree to a price increase?
Not knowing the answers to these questions might result in a loss of revenue.
Subscription churn refers to the number of subscribers/customers that stop paying for your product/service in a specific period of time.
Subscription churn may be involuntary, such as when a user’s credit card expires. It may also be voluntary, such as when a user cancels an auto-renewable subscription or requests a refund via AppleCare.
Server notifications will help you monitor users’ subscriptions. In order to receive notifications, provide your server address to iTunes Connect. This will enable you to receive notifications on:
- Initial subscription purchases
- Subscription cancellations by AppleCare
- Subscription downgrades
- Renewal or re-purchase of expired subscriptions
If you previously checked the subscription state of an app every day by means of /verifyReceipt, server notifications now let you do it less frequently. But your server should periodically send receipts to the Apple server to check the purchase status, as notifications might not be received.
Apart from that, notifications are extremely helpful, as they allow you to know if a user wants to cancel their subscription or if they have some issues related to payments. In these cases, you can:
- provide the user with a message about payment issues or canceling the subscription
- offer the user a downgraded plan or trial
- unblock user’s account immediately if the subscription is renewed
Read also: Apple Pay Capabilities and How to Integrate It Using Stripe For Your Shopping App?
Testing purchases
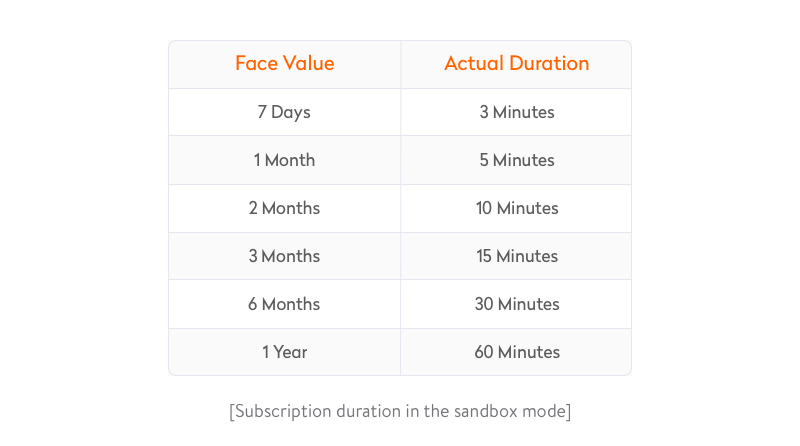
You can use the Apple sandbox environment for testing purchases during development. Just specify a test Apple ID account in the phone settings and you won’t be charged for purchases. In sandbox mode, a one-year subscription lasts for one hour.
A few final things to keep in mind
Don’t neglect validating purchases. Pay attention to developer documentation and choosing a solution and implementation details. If an app user has paid for content, problems accessing that content will harm the user experience and may lead to the loss of this user.
Additionally, not paying attention to how purchases are validated might lead to user information being captured by intruders. In either case, your business may suffer monetary and reputational losses. We hope the tips we’ve shared in this post will help you choose between the two validation techniques.
Ten articles before and after
Smart Home Automation for Android on the Example of ZigBee and Z-Wave
Why You Should Not Use Telegram Open Source Code
Best SEO Practices for React Websites
Eight Tips on How to Ensure Core Data Migration
How to Choose the Best-Fit Tools for Logistics Software Optimization
How to Quickly Import Data from JSON to Core Data
Android Studio Plugin Development