Iterative app development always entails Core Data migration, and we’ve learned a number of lessons about how to do it. Here are some helpful notes, a few warnings, and a number of useful techniques for our tech-savvy readers.
Of course, we won’t be able to completely break down migration step by step, as that would take several articles. Additionally, there’s no need to copy what’s already been said in the excellently written Core Data Versioning and Migration Guide. Our goal here is simply to share a bit of our firsthand experience.
Read also: Best Frameworks, Libraries, and SDKs That Can Help Develop Android Apps
Why migrate at all?
Most development is done in an agile manner in order to introduce a lot of changes from version to version. Sometimes these changes are planned and sometimes they’re not. Either way, changes to the requirements or to an API are supposed to improve an app’s data model. Therefore, you need to adapt all those changes from version to version without losing user data.
New techniques used in the migration process are highly dependent on the persistence framework used. In this post, we won’t talk about numerous interesting solutions like Realm, Couchbase, or YapDatabase. Instead, we’ll focus on the well-known Core Data for iOS with Swift.
Migration scheme
A model can change significantly during the development process. When it comes to Core Data, we’re talking about a new or updated .xcdatamodel.
Since the source code is mostly up to date with the latest Model version, Core Data tries to map one representation onto another. Basically, migration is all about loading a source representation, mapping it onto a representation, verifying the results, and eventually saving the new representation. In other words, migration helps us keep our model compatible with changes in the source code.
Now let’s focus specifically on how to perform a lightweight Core Data migration, mapping models, and custom migration policies.
Lightweight migration
Fortunately, Core Data frees developers from error-prone, routine work and improves their performance by doing a lot of things under the hood. Out of the box, Core Data lets developers apply minor changes to the Model without creating a database from scratch.
For Attributes:
- Add, remove, and rename an Attribute
- Mark an Attribute as optional or required
For Relationships:
- Add, remove, and rename a Relationship
- Change a Relationship from one-to-one to one-to-many, unordered to ordered, and vice versa
For Entities:
- Add, remove, and rename an Entity
- Change (add to or remove from) an inheritance hierarchy and pull or push properties
For a full set of features, check out Apple’s developer documentation on lightweight migration.
Lightweight migration is turned on automatically if you’re using the NSPersistentContainer API. However, if you want to initialize Core Data stack manually, using an old-fashioned method, you need to set two flags when setting up the data store:
let options = [
    NSMigratePersistentStoresAutomaticallyOption: true,
    NSInferMappingModelAutomaticallyOption: true
]
try coordinator.addPersistentStore(
    ofType: type,
    configurationName: configurationName,
    at: persistentStoreURL,
    options: options
)
Read also: How to move from JSON to Core Data fast and effectively
Tip 1 — Create a new model
Before changing anything, always make sure you create a new model version in Editor –> Add Model Version… Otherwise, Core Data won’t be able to open the saved store and ensure a lightweight migration.
Tip 2 — Don’t delete .xcdatamodels
Don’t delete .xcdatamodels used for the published version. This follows from the first tip.
Tip 3 — Use Renaming ID
Use Renaming ID for renamed Properties and Entities: View -> Utilities -> Show Data Model Inspector -> Edit Renaming ID. The value of the Renaming ID in the destination model should be set to the name of the corresponding Property/Entity in the source model.
Custom migration policy
If the default mapping model doesn’t meet your requirements during manual core data migrations and some extra work needs to be done, you can use a custom migration policy.
All you need to do is specify your policy class in the Mapping Model Inspector (select Mapping Model and then go to View -> Utilities -> Show Mapping Model Inspector). Make sure you add a module name and the “.” prefix when declaring your custom policy class name.
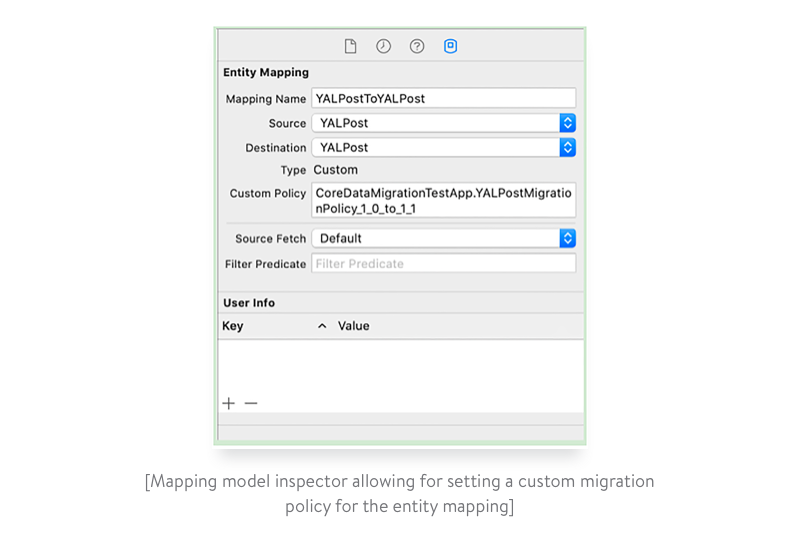
Check out the migration process tutorial for a full set of options.
Read also: Why Is Swift Faster Than Objective-C?
Tip 4 — Be aware of the instance’s class during migration
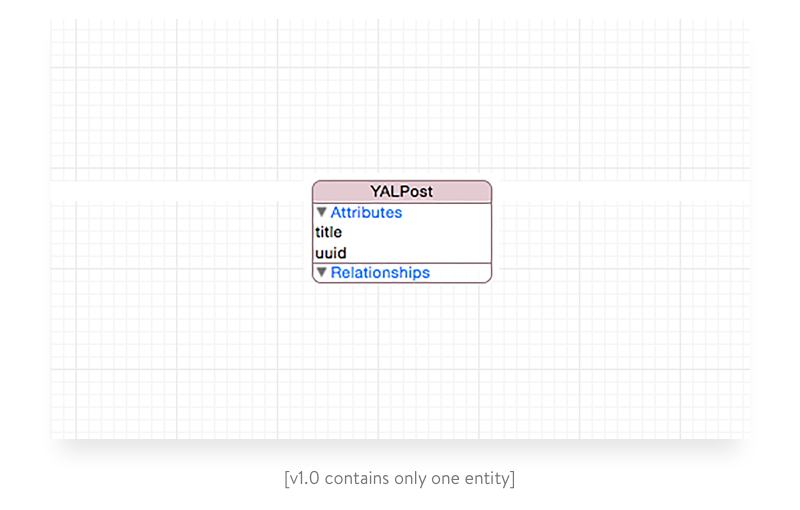
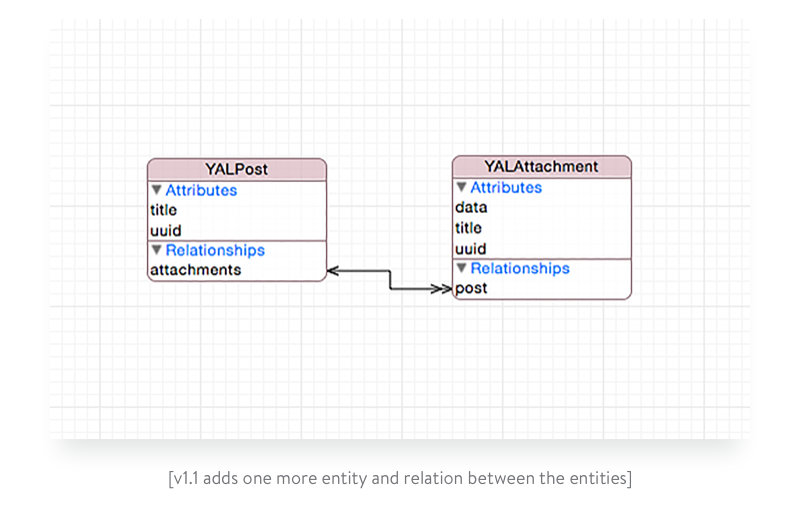
The class associated with NSEntityDescription can be ignored during migration. For example, we have two model versions: 1.0 and an updated 1.1.
class YALPostMigrationPolicy_1_0_to_1_1: NSEntityMigrationPolicy {

    override func createDestinationInstances(forSource sInstance: NSManagedObject, in mapping: NSEntityMapping, manager: NSMigrationManager) throws {
        try super.createDestinationInstances(forSource: sInstance, in: mapping, manager: manager)

        guard let mappedPost = manager.destinationInstances(
                forEntityMappingName: mapping.name,
                sourceInstances: [sInstance]
            ).first,
            let post = mappedPost as? YALPost else { return }

        post.attachments = defaultAttachments(in: manager.destinationContext)
    }

    private func defaultAttachments(in context: NSManagedObjectContext) -> NSSet {
        let attachments: [YALAttachment] = Array(1...3).map { index in
            let attachment = YALAttachment(entity: YALAttachment.entity(), insertInto: context)
            attachment.title = "Title"
            attachment.data = withUnsafeBytes(of: index) { Data($0) }
            return attachment
        }
        return NSSet(array: attachments)
    }

}
Also, it’s important to note that in YALAttachment during awakeFromInsert, the uuid is assigned a default value.
@objc(YALAttachment)
public class YALAttachment: NSManagedObject {

    public override func awakeFromInsert() {
        super.awakeFromInsert()

        uuid = UUID().uuidString
    }

}
Some explanation
First of all, we’re passing control to the default migration implementation by calling super.createDestinationInstances(forSource: sInstance, in: mapping, manager: manager). The migrated instance is then retrieved. We also perform some manual manipulations in the post and assign the generated default attachments to it. Nothing special here, right?
However, all the migrated attachments don’t have uuids after migration. How did that happen? Let’s dig around!
If we debug the migration code, we’ll notice that the cast let post = mappedPost as? YALPost fails. The reason why this happens is described in Apple’s documentation: The migration process uses a copy of the source and destination models in which the validation rules are disabled and the class of all entities is changed to NSManagedObject.
So you can’t use custom NSManagedObject subclasses within the Core Data migration process. Okay, let’s remove type casting and use KVC to set the relationship of NSManagedObject objects:
  override func createDestinationInstances(forSource sInstance: NSManagedObject, in mapping: NSEntityMapping, manager: NSMigrationManager) throws {
        try super.createDestinationInstances(forSource: sInstance, in: mapping, manager: manager)

        guard let mappedPost = manager.destinationInstances(
                forEntityMappingName: mapping.name,
                sourceInstances: [sInstance]
            ).first else { return }

        mappedPost.setValue(defaultAttachments(in: manager.destinationContext), forKey: "attachments")
    }
What do we have now? A crash in the line:
`let attachment = YALAttachment(entity: YALAttachment.entity(), insertInto: context)`The reason is still the same: we can’t use NSManagedObject subclasses within Core Data migration. So we change the code which generates default YALAttachment objects to use NSManagedObject objects and KVC:
  private func defaultAttachments(in context: NSManagedObjectContext) -> NSSet {
        let attachments: [NSManagedObject] = Array(1...3).map { index in
            let attachment = NSEntityDescription.insertNewObject(forEntityName: "YALAttachment", into: context)
            attachment.setValue("Title", forKey: "title")
            attachment.setValue(withUnsafeBytes(of: index) { Data($0) }, forKey: "data")
            return attachment
        }
        return NSSet(array: attachments)
    }
The migration passed successfully, but none of the YALAttachment objects have a uuid. That’s because the current implementation creates a new NSManagedObject, not YALAttachment. As a result, YALAttachment’s awakeFromInsert is not called. We need to move the uuid setting to the code that creates attachments.
Final implementation of the migration policy
 class YALPostMigrationPolicy_1_0_to_1_1: NSEntityMigrationPolicy {

    override func createDestinationInstances(forSource sInstance: NSManagedObject, in mapping: NSEntityMapping, manager: NSMigrationManager) throws {
        try super.createDestinationInstances(forSource: sInstance, in: mapping, manager: manager)

        guard let mappedPost = manager.destinationInstances(
                forEntityMappingName: mapping.name,
                sourceInstances: [sInstance]
            ).first else { return }

        mappedPost.setValue(defaultAttachments(in: manager.destinationContext), forKey: "attachments")
    }

    private func defaultAttachments(in context: NSManagedObjectContext) -> NSSet {
        let attachments: [NSManagedObject] = Array(1...3).map { index in
            let attachment = NSEntityDescription.insertNewObject(forEntityName: "YALAttachment", into: context)
            attachment.setValue("Title", forKey: "title")
            attachment.setValue(withUnsafeBytes(of: index) { Data($0) }, forKey: "data")
            attachment.setValue(UUID().uuidString, forKey: "uuid")
            return attachment
        }
        return NSSet(array: attachments)
    }

}
Summary of this block
You need to be aware of the instance’s class during migration. You might wonder why Apple did this. The answer may be fairly simple: there’s no guarantee that the model represents the actual class API. In order to write a class-agnostic migration, we need to avoid using any custom class to minimize risks. All we have is NSManagedObject and KVC.
As you see, such steps taken force us to move custom logic to separate objects. It makes testing code much easier. However, it may lead to breaking encapsulation in some cases.
Read also: Reactive Programming in Swift
Tip 5 — Move deprecated APIs to the migration policy
Keep your code clean by moving deprecated APIs to a custom migration policy. Since a migration policy subclass represents a snapshot on the versions timeline, it’s a perfect place to put deprecated APIs. However, this requires you to rewrite deprecated functions in correspondence with KVC usage without any direct messaging.
Tip 6 — Migration
Do as little as possible during migration.
Due to the change in the way previews are stored, migration took about 12 seconds for 1,000 records in one of the apps we developed! Time Profiler happened to be using a huge amount of UIImage rendering, which was part of the logic for the destination model. In order to speed it up, we did a little trick — moved the preview to the private destination path directly instead of using the public API. It saved us about 11 seconds!
Why is this important? Users don’t want to wait. They’re likely to reboot the app on their iPhones after 5 to 10 seconds of waiting. However, breaking migration leads to even more complex problems such as losing user data. Therefore, do as many manipulations as possible during migration.
Tip 7 — Use of progressive migration
Imagine your app has four versions (1.0, 1.1, 1.2, and 2.0) that are all being used simultaneously. Some of your users haven’t updated the app yet. If we do the migration manually, then the number of mapping models equals n-1, where n is the number of released versions. Therefore, adding a new version becomes a real nightmare.
On the other hand, progressive migration leads you to n-1 mapping models. As a result, you have six versus three models for four released versions.
We won’t cover the implementation of progressive migration in this article, but you can read about objc.io custom migration and progressive Core Data migrations.
Tip 8 — Initialize wisely
Initialize your app wisely. From our experience, it’s best to initialize an app’s resources in a background thread. This allows us to perform migration and other time-consuming work without the fear of being terminated by the watchdog. Here’s an example of a simplified app init:
 func application(_ application: UIApplication, didFinishLaunchingWithOptions launchOptions: [UIApplication.LaunchOptionsKey: Any]?) -> Bool {
        // Create window and set empty view controller as a root to display potential migration progress
        let window = UIWindow(frame: UIScreen.main.bounds)
        window.rootViewController = InitializationViewController()
        window.makeKeyAndVisible()
        self.window = window

        let backgroundQueue = DispatchQueue(label: "com.bundle.identifier")
        // Move execution asynchronously to background queue to free main queue
        backgroundQueue.async {
            // Perform migration-related code on background queue asycnronously

            // check if migration is required
            // perform migration if needed

            // Switch to main queue and change root view controller to the one application flow requires
            DispatchQueue.main.async {
                window.rootViewController = TimelineViewController()
            }
        }

        return true
    }
As a result, you get more control over the init flow. But it brings complexity to the initialization during state restoration.
That’s it for today. As you can see, it can be tricky to maintain a project when it comes to versioning, migration, and backward compatibility. However, Core Data really simplifies the migration process. We hope our experience with Core Data migration is helpful. Let us know if you have any questions!
Ten articles before and after
How to Choose the Best-Fit Tools for Logistics Software Optimization
Full List of the Best Android App Development Tools in 2021
How to Use WebSockets in Go: A Comprehensive Guide
Which Tool Your Logistics App Needs: Mapbox or Google Maps Platform
Top Reasons for Cloud Migration and Step-by-Step Instructions
Best SEO Practices for React Websites
Why You Should Not Use Telegram Open Source Code
Smart Home Automation for Android on the Example of ZigBee and Z-Wave
How to Validate In-App Purchases On-Device and Through a Client’s Own Server