This post is for developers who want to get started with Android NDK and want to know all the niceties of using it for developing in Kotlin.
To see the whole picture, I suggest we start with the theoretical part. Then we’ll proceed to the practical part, with a detailed sample project written in Kotlin.
Why do we need the Android NDK?
The Android Native Development Kit (NDK) lets developers write parts of their apps in native code (C/C++) which significantly improves application performance. Many multimedia applications and games use native code for processor-intensive tasks.
Used in conjunction with the Android SDK, the NDK toolset provides access to platform libraries that app developers can use to manage native activities and access physical device components such as sensors and touch input.
It’s also possible to use your own libraries or to use popular C/C++ libraries that have no equivalents in Java (such as the ffmpeg library written in C/C++ to process audio and video or the jnigraphics library to process bitmaps).
What exactly does the NDK include?
The NDK’s default tools are a debugger, CMake, and the Java Native Interface (or JNI), which does all the heavy lifting – handles the interaction between Java and native code.
The JNI defines how managed code (written in Java or Kotlin) communicates with native code (written in C/C++). How does this happen? Both managed code and native code have functions and variables. The JNI makes it possible to call functions written in C/C++ from Java or Kotlin, and vice versa. It also lets us read and change values stored in variables across languages.
“Why can we apply the JNI to both Java and Kotlin?” you may ask. The answer is pretty simple: Java and Kotlin are interoperable to such an extent that they are compiled to the same bytecode. In fact, the JNI’s task is not to manage the interaction between Java/Kotlin and C/C++, but to manage the interaction between this bytecode and the native language. Since we always get the same bytecode regardless of which high-level language we compile, we can apply JNI to both Java and Kotlin.
Read also: Which Android Frameworks, Libraries, and SDKs to Choose
Now let’s look at the NDK in action.
Getting started
Let’s create a new Kotlin project (as of the time of writing, the current version of Android Studio is 2.3.2). To set up your project, do the following:
- Download NDK, LLDB (a software debugger), and CMake using the SDK Manager.
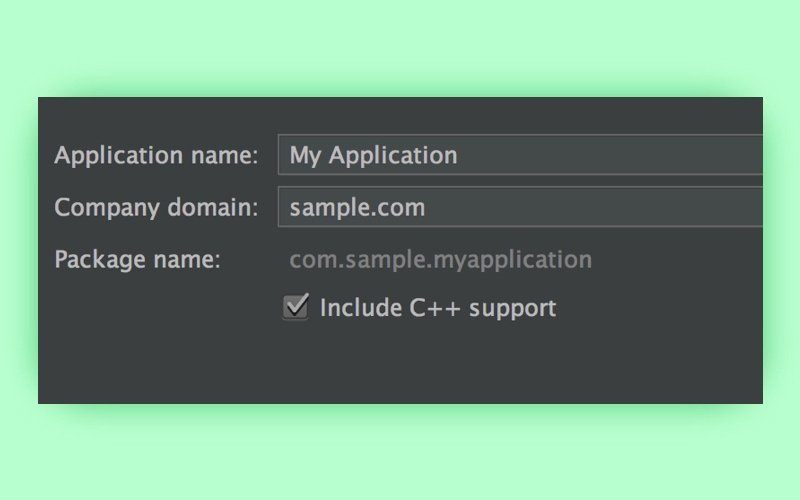
- Include C++ support using the checkbox on the New Project screen.
-
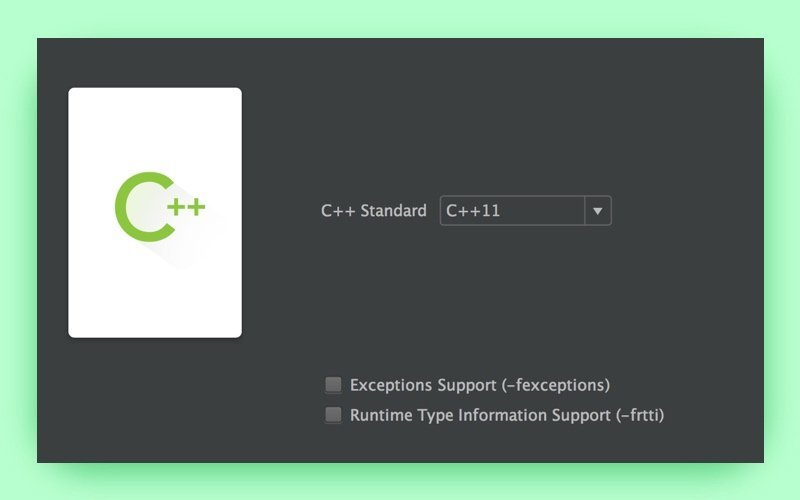
If you want to use some features like lambda or delegating constructors, you’ll have to use C++11. To do so, choose the appropriate item from the drop-down list on the Customize C++ support screen.
Otherwise, the process of creating a new project in Kotlin is the same as with Java. To adjust your project to use Kotlin, you have to install a special Kotlin plugin. After that, press Ctrl+Shift+a and input the “Configure Kotlin in Project” command. To convert any Java file to Kotlin, open it and use the “Convert Java file to Kotlin” command.
Read also: How to Create a Simple Plugin for Android Studio
Exploring the project structure
If all previous steps have been done successfully, you’ll have a project with the following structure:
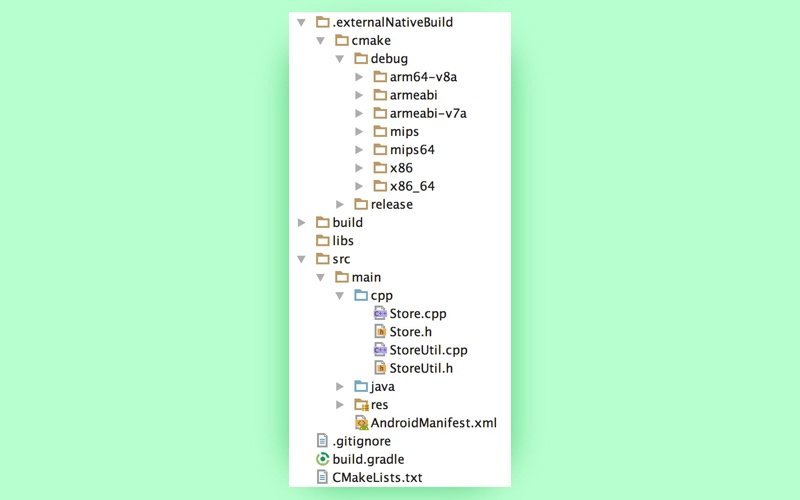
You can put your C/C++ source code in the cpp folder. CMake will generate the .externalNativeBuild folder.
-
СMake
So what’s CMake? CMake is a tool that controls and manages the compilation process using a configuration file called CMakeList.txt.
You can set a minimum required version of CMake:
cmake_minimum_required(VERSION 3.4.1)As we know, first we compile an Android program and then we package all its parts into a single APK file. The contents of our APK will look as follows:
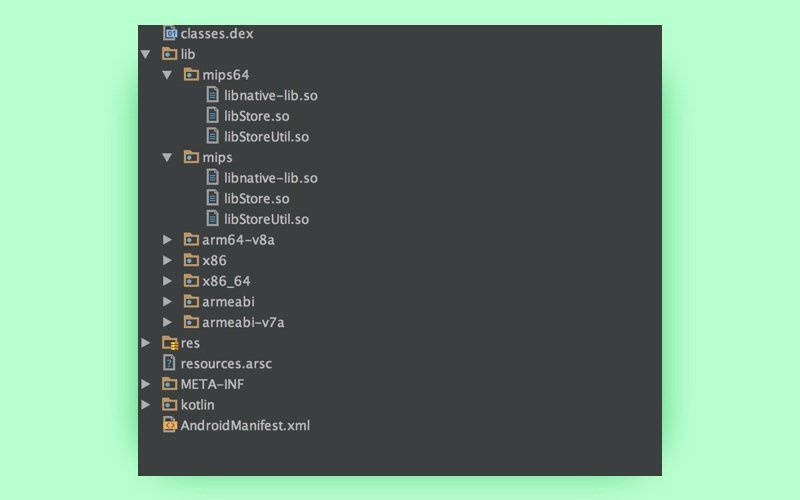
As you can see, our APK has an additional lib folder that contains folders for different CPUs, which, in turn, support different instruction sets. The thing is, the part of your app written in native code is usually packaged into a separate library (the lib folder, in my case) or into several of them. To get all of your native code gathered into such a library, you need to specify how CMake should package your C/C++ code. This is usually done with the help of the add_library function.
The add_library function creates and names your library, declares it as either STATIC or SHARED, and provides relative paths to its source code. You can define multiple libraries and CMake will build them for you. Gradle will then automatically package all shared libraries into your APK.
add_library( # Sets the name of the library.
             StoreUtil

             # Sets the library as a shared library.
             SHARED

             # Provides a relative path to your source file(s).
             src/main/cpp/StoreUtil.cpp)

add_library( # Sets the name of the library.
             Store

             # Sets the library as a shared library.
             SHARED

             # Provides a relative path to your source file(s).
             src/main/cpp/Store.cpp
             src/main/cpp/StoreUtil.cpp)
You can use different third-party C/C++ libraries in your project. To integrate a library, use the find-library function, which retrieves the name and type of a library as well as a path. The find_library function searches for your specified prebuilt library and stores its path as a variable.
-
Header files
In C/C++, header files contain definitions of functions and variables. There are two types of header files: system header files (which come with a compiler) and user header files (which are written by a developer). Why do we need header files?
You can use a header file to create certain new data types:
#ifndef INMEMORYSTORAGE_STORE_H
#define INMEMORYSTORAGE_STORE_H

#include <cstdint>
#include "jni.h"

#define STORE_MAX_CAPACITY 16

typedef struct {
    StoreEntry mEntries[STORE_MAX_CAPACITY];
    int32_t mLength;
} Store;

#endif //INMEMORYSTORAGE_STORE_H
You can also declare functions in these files:
#ifndef INMEMORYSTORAGE_STOREUTIL_H
#define INMEMORYSTORAGE_STOREUTIL_H

#include <jni.h>
#include "Store.h"

bool isEntryValid(JNIEnv* pEnv, StoreEntry* pEntry, StoreType pType);

StoreEntry* allocateEntry(JNIEnv* pEnv, Store* pStore, jstring pKey);

StoreEntry* findEntry(JNIEnv* pEnv, Store* pStore, jstring pKey);

void releaseEntryValue(JNIEnv* pEnv, StoreEntry* pEntry);

void throwNoKeyException(JNIEnv* pEnv);

#endif //INMEMORYSTORAGE_STOREUTIL_H
You can then use these new data types and declared functions in your project.
To add a standard header file, use #include <file>; for your own header files, you need to use #include “file”. This way the content from a header file will be copied to your *.cpp file.
-
Primitive Types of the JNI
We have to invoke functions written in C/C++ to deal with our native code. Each primitive in Java has a corresponding native type:
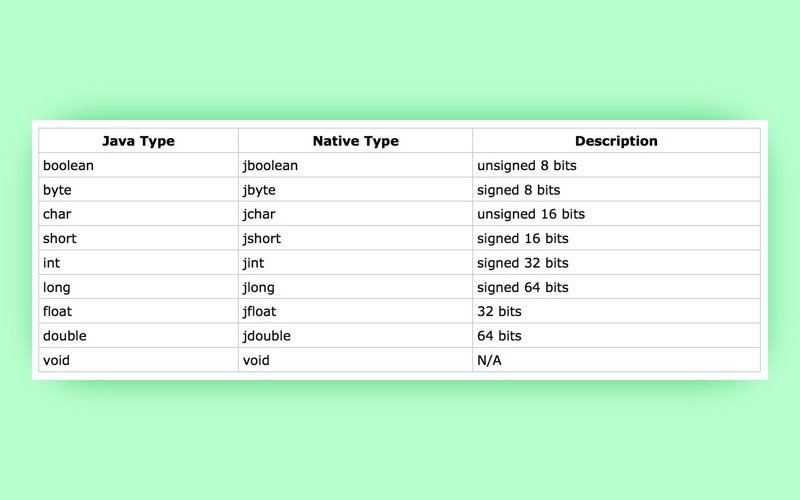
If you want to create a function that adds two values and returns a result, you’ll need to write something like this:
extern "C"
JNIEXPORT jint JNICALL
Java_your_package_name_Math_add(
        JNIEnv* pEnv,
        jobject pThis,
        jint a,
        jint b) {
    return a + b;
}-
Reference Types in the JNI
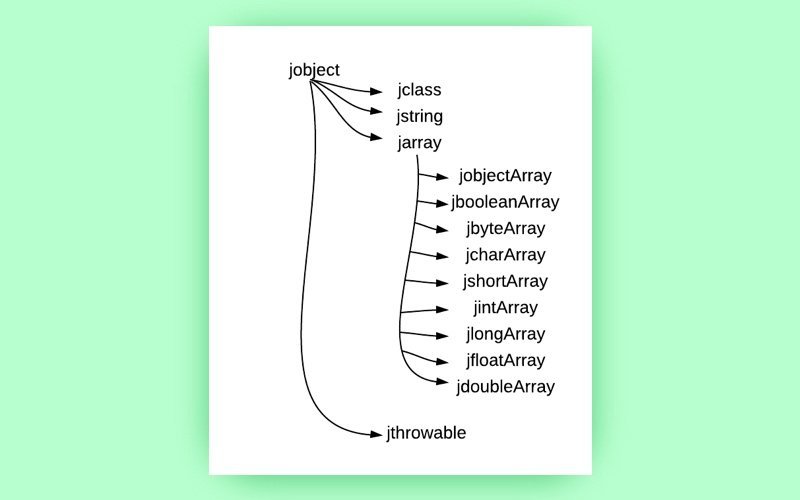
The JNI also includes a number of reference types that correspond to different kinds of Java objects:
-
The difference between Java strings and C/C++ strings
The JNI uses modified UTF-8 strings to represent various string types. Java strings are stored in memory as UTF-16 strings. To convert a Java string to a C/C++ string, you can use something like this:
extern "C"
JNIEXPORT void JNICALL
Java_com_ihorkucherenko_storage_Store_setString(
        JNIEnv* pEnv,
        jobject pThis,
        jstring pKey,
        jstring pString) {
    // Turns the Java string into a temporary C string.
    StoreEntry* entry = allocateEntry(pEnv, &gStore, pKey);
    if (entry != NULL) {
        entry->mType = StoreType_String;
        // Copy the temporary C string into its dynamically allocated
        // final location. Then releases the temporary string.
        jsize stringLength = pEnv->GetStringUTFLength(pString);
        entry->mValue.mString = new char[stringLength + 1];
        // Directly copies the Java String into our new C buffer.
        pEnv->GetStringUTFRegion(pString, 0, stringLength, entry->mValue.mString);
        // Append the null character for string termination.
        entry->mValue.mString[stringLength] = '\0';
    }
}-
JNI functions
To call a native function from Java or Kotlin, you have to add the extern “C” keyword and the JNIEXPORT macro. A macro is a fragment of code with a corresponding name. Whenever this name is used, it’s replaced by the contents of the macro. In our case, we have JNIEXPORT from the jni.h file:
#define JNIIMPORT
#define JNIEXPORT  __attribute__ ((visibility ("default")))
#define JNICALL
JNIEXPORT will be replaced by __attribute__ ((visibility (“default”))). Then we have to specify a return type and the JNICALL macro. The name of your function should start with Java and the full name of your class that contains the corresponding method in Java or Kotlin code:
package your.package.name

class Math {

    external fun add(a: Int, b: Int): Int

}
Your native function needs to take at least two arguments – JNIEnv* pEnv and jobjectpThis.
-
Enum, Union, and Struct
Enumeration (or Enum) is a user-defined data type that consists of integral constants. To define enumeration, we need to use the “enum” keyword.
typedef enum {
    StoreType_Float,
    StoreType_String,
    StoreType_Integer,
    StoreType_Object,
    StoreType_Boolean,
    StoreType_Short,
    StoreType_Long,
    StoreType_Double,
    StoreType_Byte,
} StoreType;
A union is a special data type in C that allows you to store different data types in the same memory location.
typedef union {
    float mFloat;
    int32_t mInteger;
    char* mString;
    jobject mObject;
    jboolean mBoolean;
    jshort mShort;
    jlong mLong;
    jdouble mDouble;
    jbyte mByte;
} StoreValue;
A structure (or Struct) allows us to combine data items of different kinds.
typedef struct {
    char* mKey;
    StoreType mType;
    StoreValue mValue;
} StoreEntry;
You can create instances of these data types in the *.h or *.cpp file. If you want to use a structure in different places, you should place the structure in the header file. Otherwise, it’s possible to choose *.cpp for creating new data types and declaring functions.
-
Pointers
The pointer in C/C++ is a variable that contains a unique address to each cell of memory.
int var = 20; //actual variable decalration
int *ip; //pointer variable declaration
ip = &var; //store address of var in pointer
As you can see, to get a pointer to some variable you have to use &, and declare this pointer you have to use *.
It’s not advisable to have a lot of pointers to Java objects in our native code. Unlike С/C++, Java objects don’t usually have a fixed location in memory because they move around within memory all the time. If your Java object moves to another memory location, a pointer to that object in C/C++ will still point to its old location in memory.
You can check out these tests to get a better understanding of all the subtleties:
-
Types of references
To work with your jobject, you have to create a Local, Weak, or Global reference to it.
As we know, JNIEnv* pEnv provides most of the JNI functions, including jobject NewGlobalRef(JNIEnv *env, jobject obj),jweak NewWeakGlobalRef(JNIEnv *env, jobject obj), and jobject NewLocalRef(JNIEnv *env, jobject ref), which creates references of an appropriate type (see the reference type in the JNI section).
extern "C"
JNIEXPORT void JNICALL
Java_com_ihorkucherenko_storage_Store_setObject(
        JNIEnv* pEnv,
        jobject pThis,
        jstring pKey,
        jobject pObject) {
    StoreEntry* entry = allocateEntry(pEnv, &gStore, pKey);
    if (entry != NULL) {
        entry->mType = StoreType_Object;
        entry->mValue.mObject = pEnv->NewGlobalRef(pObject);
        if(entry->mValue.mObject != NULL) {
            __android_log_print(ANDROID_LOG_INFO,  __FUNCTION__, "SUCCESS");
        }
    }
}
Here we have a pointer to the JNIEnv* pEnv structure. If you want to refer to a member of this pointer, you have to use the arrow operator (->).
Local references are only valid during a native method call. They are freed automatically after a native method returns. Each local reference occupies some amount of Java Virtual Machine resources. Programmers need to make sure that native methods don’t excessively allocate local references. Although local references are automatically freed after a native method returns to Java, excessive allocation of local references may cause the JVM to run out of memory during the execution of a native method.
Weak global references are a special kind of global reference. Unlike normal global references, weak global references allow the underlying Java object to be garbage collected. Weak global references may be used in any situation where global or local references are used. When the garbage collector runs, it frees the underlying object if the object is only referred to by weak references. A weak global reference pointing to a freed object is functionally equivalent to NULL. Programmers can detect whether a weak global reference points to a freed object by using IsSameObject to compare the weak reference against NULL.
Weak global references in the JNI are a simplified version of Java Weak References, available as part of the Java 2 Platform API ( java.lang.refpackage and its classes).
Global references allow native code to promote a local reference into a form usable by native code in any thread attached to the JVM. References of this type are not automatically deleted, so the programmer must handle memory management. Every global reference establishes a root for a referent and makes its entire subtree reachable. Therefore, every global reference created must be freed to prevent memory leaks.
There are several functions to delete different types of references: void DeleteLocalRef(JNIEnv *env, jobject localRef), void DeleteGlobalRef(JNIEnv *env, jobjectglobalRef), and void DeleteWeakGlobalRef(JNIEnv *env, jweak obj)
Read also: How Code Quality Is Measured: Android Code Review at Yalantis
Sample project
Now you have some basic theoretical knowledge that’s enough to start using C/C++ in your projects. I’ve decided to create a sample project that contains a simple in-memory storage module written in C/C++.

To encapsulate all native functions, I created a Store class.
class Store {

    external fun getCount(): Int

    @Throws(IllegalArgumentException::class)
    external fun getString(pKey: String): String

    @Throws(IllegalArgumentException::class)
    external fun getInteger(pKey: String): Int

    @Throws(IllegalArgumentException::class)
    external fun getFloat(pKey: String): Float

    ....

    external fun setString(pKey: String, pString: String)

    external fun setInteger(pKey: String, pInt: Int)

    external fun setFloat(pKey: String, pFloat: Float)

    external fun setBoolean(pKey: String, pBoolean: Boolean)

    ....

    companion object {
        init {
            System.loadLibrary("Store")
        }
    }
}
All these methods have their corresponding native functions in the Store.cpp file.
In the CMake section, we learned how to use the add_library function to create a shared library. You can load your native code from shared libraries with the standard System.loadLibrary call. At this time, the method JNI_onLoad is invoked.
extern "C" JNIEXPORT jint JNI_OnLoad(JavaVM* vm, void* reserved)
{
    __android_log_print(ANDROID_LOG_INFO,  __FUNCTION__, "onLoad");
    JNIEnv* env;
    if (vm->GetEnv(reinterpret_cast<void**>(&env), JNI_VERSION_1_6) != JNI_OK) {
        return -1;
    }

    gStore.mLength = 0;
    return JNI_VERSION_1_6;
}
You can use this method to initialize some variable.
Our CMakeLists.txt file also contains the target_link_libraries call to add a library to log to the project. We can include this library (#include <android/log.h>) in the *.cpp file and log an event: __android_log_print(ANDROID_LOG_INFO, __FUNCTION__, “onLoad”).
Note that in Kotlin we use the init block of a companion object instead of the static block; we also use an external keyword instead of a native.
As you might have already noticed, native methods can throw Java exceptions. If you try to get some non-existent value from the Store, it will throw an exception. The StoreUtil.cpp file contains the throwNoKeyException function for this:
bool isEntryValid(JNIEnv* pEnv, StoreEntry* pEntry, StoreType pType)
{
    if(pEntry == NULL)
    {
        throwNoKeyException(pEnv);
    }

    return ((pEntry != NULL) && (pEntry->mType == pType));
}

void throwNoKeyException(JNIEnv* pEnv) {
    jclass clazz = pEnv->FindClass("java/lang/IllegalArgumentException");
    if (clazz != NULL) {
        pEnv->ThrowNew(clazz, "Key does not exist.");
    }
    pEnv->DeleteLocalRef(clazz);
}
This simple in-memory storage module that can be used to pass some value – primitive data type or reference data type – from one activity to another. This storage works similarly to IBinder.
Now it’s time to move to the practical part working with the Android NDK.
Why do you need to call Kotlin from native code?
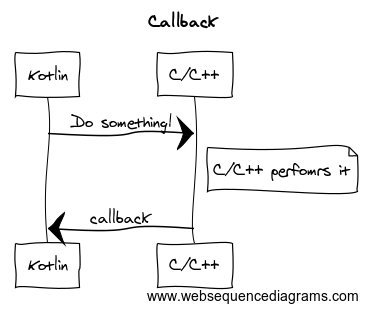
The most obvious reason to call Kotlin from native code is for callbacks. When you perform an operation, you need to know when it’s done and receive the result of that operation. This is true whether you work with Kotlin or the JNI (Java Native Interface).
Calling static properties
The JNIEnv pointer contains many functions to deal with static fields. First, you have to get the ID of the static field using the jfieldID GetStaticFieldID(JNIEnv *env, jclassclazz, const char *name, const char *sig) function.
Kotlin doesn’t have static members, but each Kotlin class can have a companion object, so you can use companion objects’ fields and functions similarly. A companion object is initialized when the corresponding class is loaded, matching the semantics of the Java static initializer. Thus, you can use a companion object to load native libraries:
class Store {

    companion object {
        init {
            System.loadLibrary("Store")
        }
    }
}
You can create a field in the companion object:
companion object {

+        val static: Int = 3

        init {
            System.loadLibrary("Store")
        }

}
JNIEnv contains different functions to access static field values from native code:
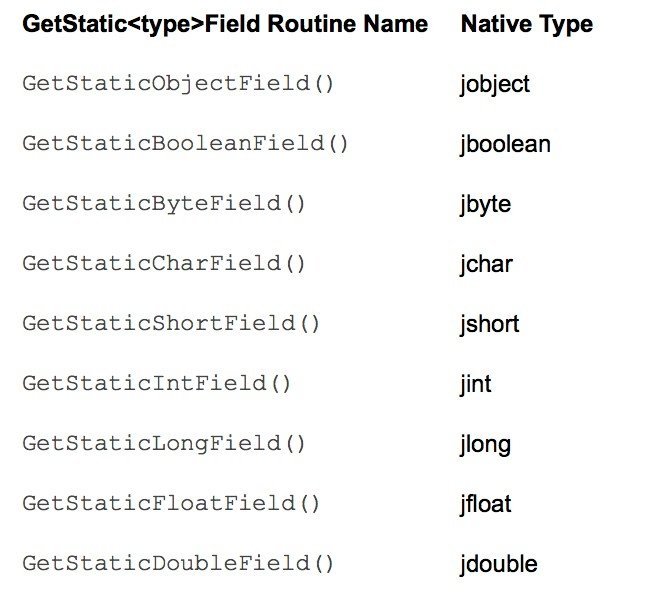
[Image source: JavaSE documentation]
You can get the int value as follows:
jclass clazz = env->FindClass("com/ihorkucherenko/storage/Store");
jfieldID fieldId = env->GetStaticFieldID(clazz, "static", "I");
if (fieldId == NULL) {
    __android_log_print(ANDROID_LOG_INFO,  __FUNCTION__, "fieldId == null");
} else {
    jint fieldValue = env->GetStaticIntField(clazz, fieldId);
    __android_log_print(ANDROID_LOG_INFO,  __FUNCTION__, "Field value: %d ", fieldValue); //Field value: 3
}
To determine a method’s signature, use type codes. The following table summarizes the various types available in the JNI, along with their codes:
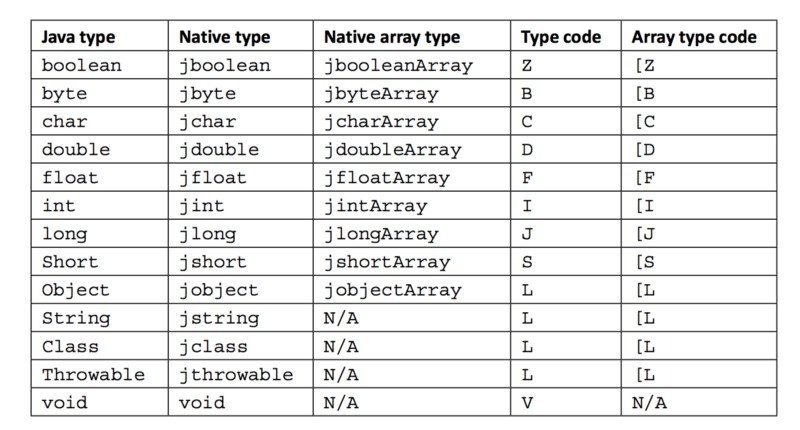
In the picture above, the compiler generates a private static field in the Store class. The Store class contains fields with the private modifier. You can’t access those fields from the Store class. But with the JNI, you can access the values of those fields even if the private modifier is set.
// access flags 0x31
public final class com/ihorkucherenko/storage/Store {
  // access flags 0xA
  private static I static

  ....

}
If you just create this field in a simple class, you get an exception: java.lang.NoSuchFieldError: no “I” field “static” in class “Lcom/ihorkucherenko/storage/Store;” or its superclasses. If you use the Int? type, you also receive this error. To avoid this error, follow the instructions below.
Calling static methods
To get the ID of a static method, you have to use jmethodID GetStaticMethodID(JNIEnv *env, jclass clazz, const char *name, const char *sig).
JNIEnv contains three types of functions that can call static methods:
1. NativeType CallStatic<type>Method(JNIEnv *env, jclass clazz, jmethodID methodID, ...)
2. NativeType CallStatic<type>MethodA(JNIEnv *env, jclassclazz, jmethodIDmethodID, jvalue *args)
3. NativeType CallStatic<type>MethodV(JNIEnv *env, jclassclazz, jmethodIDmethodID, va_list args)
These types of functions differ in their arguments. Therefore, we have the following set of functions:
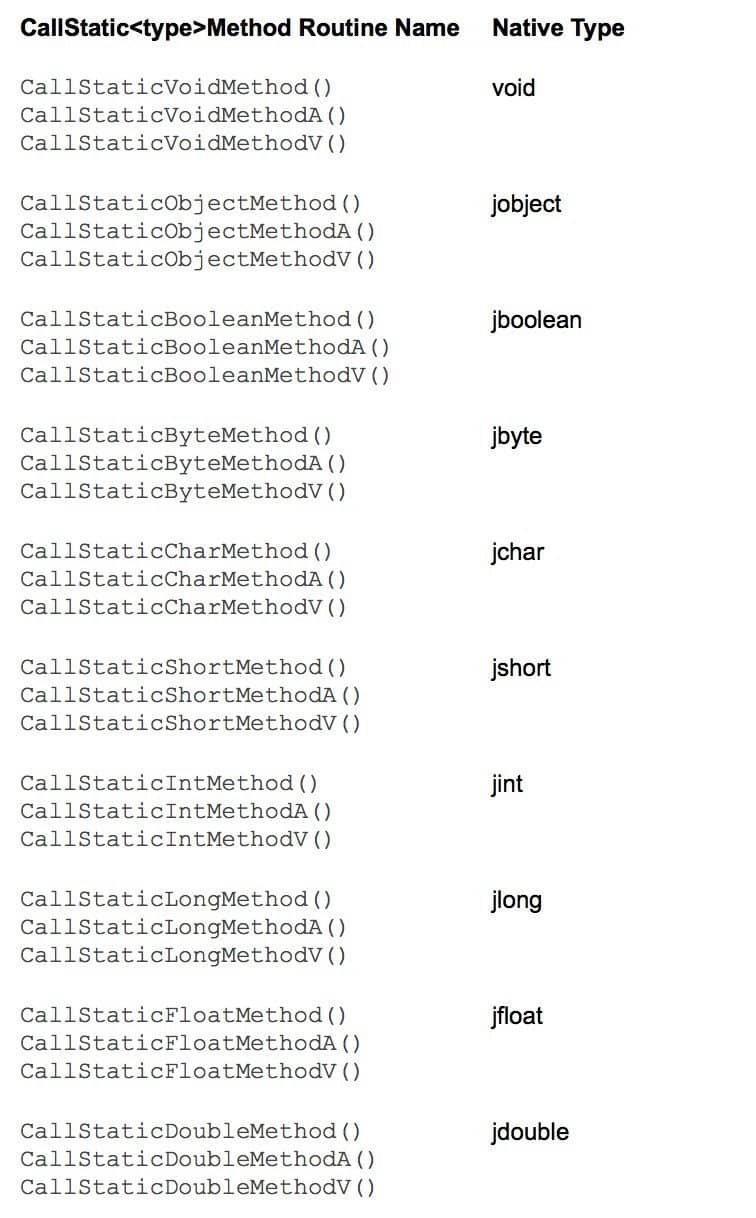
[Image source: Java SE Documantation]
Let’s try to invoke static methods.
class Store {

    .........

    companion object {

        @JvmStatic
        fun staticMethod(int: Int) = int

        init {
            System.loadLibrary("Store")
        }
    }
}
You have to use @JvmStatic to generate an additional static method. You can see this static metod in bytecode:
// access flags 0x19
  public final static staticMethod(I)I
  @Lkotlin/jvm/JvmStatic;()
   L0
    GETSTATIC com/ihorkucherenko/storage/Store.Companion : Lcom/ihorkucherenko/storage/Store$Companion;
    ILOAD 0
    INVOKEVIRTUAL com/ihorkucherenko/storage/Store$Companion.staticMethod (I)I
    IRETURN
   L1
    LOCALVARIABLE int I L0 L1 0
    MAXSTACK = 2
    MAXLOCALS = 1
Pay attention to the (I)I. This is the JNI’s representation of the type signature.
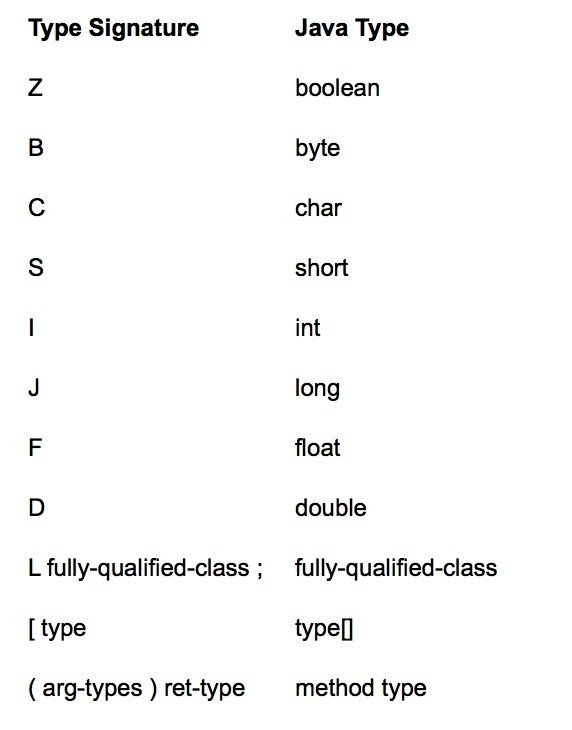
Types of arguments are specified in parentheses. Here are several examples:
1. Kotlin:
@JvmStatic
fun staticMethod(int: Int, floaf: Float) = int
Native code:
public final staticMethod(IF)I2. Kotlin:
@JvmStatic
fun staticMethod(int: Int, floaf: Float, string: String) = int
Native code:
public final staticMethod(IFLjava/lang/String;)IYou should point the return type after parentheses. Here’s how we call a Kotlin function from native code:
jclass clazz = env->FindClass("com/ihorkucherenko/storage/Store");
jmethodID methodId = env->GetStaticMethodID(clazz, "staticMethod", "(I)I");
if (methodId == NULL) {
    __android_log_print(ANDROID_LOG_INFO,  __FUNCTION__, "methodId == null");
} else {
    jint value = env->CallStaticIntMethod(clazz, methodId, 4);
    __android_log_print(ANDROID_LOG_INFO,  __FUNCTION__, "value: %d ", value); //value: 4
}
Calling an instance’s properties
Similarly to the previous code examples, you should use functions to retrieve the ID of the field and value: jfieldID GetFieldID(JNIEnv *env, jclassclazz, const char *name, const char *sig).
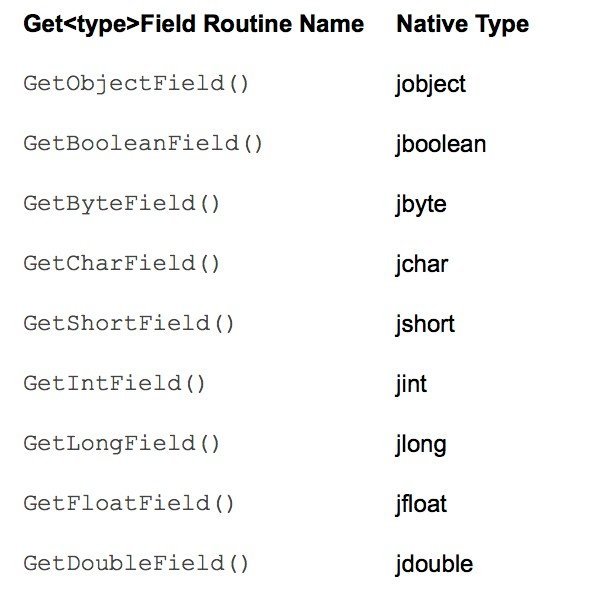
Let’s add private val property = 3, which is equal to private final I property = 3 in bytecode, to the Store class. After that, you have to get jobject, which refers to the instance of the Store class, in order to retrieve the value from property. For example, you can create a new jobject inside the native code and get the value:
jclass clazz = env->FindClass("com/ihorkucherenko/storage/Store");
jmethodID constructor = env->GetMethodID(clazz, "<init>", "()V");
jobject storeObject = env->NewObject(clazz, constructor);

jfieldID fieldId = env->GetFieldID(clazz, "property", "I");
jint value = env->GetIntField(storeObject, fieldId);
__android_log_print(ANDROID_LOG_INFO,  __FUNCTION__, "Property value: %d ", value); //Property value: 3
Calling an instance’s methods
There is no significant difference between calling static and instance methods. Let’s look at an example:
jclass clazz = env->FindClass("com/ihorkucherenko/storage/Store");
jmethodID constructor = env->GetMethodID(clazz, "<init>", "()V");
jobject storeObject = env->NewObject(clazz, constructor);

jmethodID methodId = env->GetMethodID(clazz, "getSomething", "()I");
jint value = env->CallIntMethod(storeObject, methodId);
__android_log_print(ANDROID_LOG_INFO,  __FUNCTION__, "value: %d ", value); //value: 3
The difference between calling static and instance methods is that for instance method, you need to have jobject to pass it to CallIntMethod.
Callback example
Let’s add a simple callback to the Store:
interface StoreListener {

    fun onIntegerSet(key: String, value: Int)

    fun onStringSet(key: String, value: String)

}
class Store : StoreListener {

    val listeners = mutableListOf<StoreListener>()

    override fun onIntegerSet(key: String, value: Int) {
        listeners.forEach { it.onIntegerSet(key, value) }
    }

    override fun onStringSet(key: String, value: String) {
        listeners.forEach { it.onStringSet(key, value) }
    }

  .....
}
You can invoke these methods from proper native functions:
JNIEXPORT void JNICALL
Java_com_ihorkucherenko_storage_Store_setString(
        JNIEnv* pEnv,
        jobject pThis,
        jstring pKey,
        jstring pString) {
    // Turns the Java string into a temporary C string.
    StoreEntry* entry = allocateEntry(pEnv, &gStore, pKey);
    if (entry != NULL) {
        entry->mType = StoreType_String;
        // Copy the temporary C string into its dynamically allocated
        // final location. Then releases the temporary string.
        jsize stringLength = pEnv->GetStringUTFLength(pString);
        entry->mValue.mString = new char[stringLength + 1];
        // Directly copies the Java String into our new C buffer.
        pEnv->GetStringUTFRegion(pString, 0, stringLength, entry->mValue.mString);
        // Append the null character for string termination.
        entry->mValue.mString[stringLength] = '\0';

+        jclass clazz = pEnv->FindClass("com/ihorkucherenko/storage/Store");
+        jmethodID methodId = pEnv->GetMethodID(clazz, "onStringSet", "(Ljava/lang/String;Ljava/lang/String;)V");
+        pEnv->CallVoidMethod(pThis, methodId, pKey, pString);
    }
}

extern "C"
JNIEXPORT void JNICALL
Java_com_ihorkucherenko_storage_Store_setInteger(
        JNIEnv* pEnv,
        jobject pThis,
        jstring pKey,
        jint pInteger) {
    StoreEntry* entry = allocateEntry(pEnv, &gStore, pKey);
    if (entry != NULL) {
        entry->mType = StoreType_Integer;
        entry->mValue.mInteger = pInteger;

+        jclass clazz = pEnv->FindClass("com/ihorkucherenko/storage/Store");
+        jmethodID methodId = pEnv->GetMethodID(clazz, "onIntegerSet", "(Ljava/lang/String;I)V");
+        pEnv->CallVoidMethod(pThis, methodId, pKey, pInteger);
    }
}
Let’s test it:
@Test
fun storeListener() {
  val valueInt = 3
  val keyInt = "integer"
  val valueString = "value"
  val keyString = "string"
  store.listeners.add(object : StoreListener {

      override fun onIntegerSet(key: String, value: Int) {
         assertEquals(keyInt, key)
         assertEquals(valueInt, value)
      }

      override fun onStringSet(key: String, value: String) {
          assertEquals(keyString, key)
          assertEquals(valueString, value)
      }
  })
  store.setInteger(keyInt, valueInt)
  store.setString(keyString, valueString)
}
In this article, we started with a bit of theory and then created our sample project. We converted Java strings inside native code, passed Kotlin objects to native code, called functions, and threw exceptions in Java. Finally, we’ve learned how to make Kotlin communicate with C/C++. Kotlin can call C/C++ code with any type of data or objects.
Kotlin is a new official tool for Android Development, and this article demonstrates that this programming language works with the Android NDK without any difficulties.
Ten articles before and after
What You Can Create with FFmpeg Filters and Frei0r Plugin Effects
API Versioning: Which Gem to Pick for API Versioning on Ruby on Rails
When and Why Angular Is a Good Technical Solution for Your Project
How to Develop a Multi-Language Ruby on Rails Application and Take It Global
Testing Web Software: Unit Testing Methods
Integrating SiriKit in a Third-Party iOS App
Using Machine Learning Algorithm for Predicting House Valuations
Introducing Horizon, Our Open Source Library for Sound Visualization
How We Created uCrop, Our Own Image Cropping Library for Android
Introducing uCrop, Our Own Image Cropping Library for Android